Unified is a set of software packages designed to work with text data. Many projects including Gatsby uses it to render markdown. In this post, I'll walk through setting up a processor using Unified. We'll start by just processing .txt files, but by the end, we'll have a working compiler from Markdown to HTML. We'll also write several of our own plugins for Unified.
I'm going to assume some basic familiarity with JavaScript and NPM, but my hope is that those new to Node or modern JavaScript will still be able to follow along. That said, the topics will gradually get more difficult as the post continues.
Link to this section Setup
Unified is written as JavaScript modules intended to be run with NodeJS. Start by setting up a new npm package.
mkdir unified-examplecd unified-examplenpm init -y
This will generate a package.json file for you.
The Unified ecosystem uses ECMAScript modules exclusively. However, Node defaults to using CommonJS modules. We will need to modify the package.json file to enable modules. Open up this folder in your text editor of choice, and add a "type": "module" declaration at the end:
{[...],"type": "module"}
Next, we can install Unified itself.
npm install unified
Let's create an index.js file for our code.
import { unified } from "unified";const processor = unified();
And finally, add an npm run build command to our package.json. Modify the "scripts" section to add the following.
"scripts": {"build": "node ./index.js",...}
We can now run our pipeline with npm run build.
And... nothing happened! That's okay: We aren't feeding anything to our processor yet.
Link to this section Input and Output
Let's configure our processor to read from a src directory, and write to a dist directory.
mkdir srcmkdir dist
Now, we need some way to run multiple files through our pipeline. We can use unified-engine for this. The engine will select all files from our source paths, run them through the processor, and output them to the destination path.
npm install unified-engine
And finally, let's use it in our code.
import { unified } from "unified";import { engine } from "unified-engine";const processor = unified();await new Promise((resolve, reject) => {try {engine({processor,files: ["./src/**/*.txt"],output: "./dist",},resolve);} catch (error) {reject(error);}});
unified-enginewill call a callback function when it is finished processing all files. Unfortunately, it doesn't supportawait-ing the result directly. So, we useawait new Promiseto wait for the callback. If you aren't familiar with Promises, you can think of this as "waiting for the callback to be called" instead of writing a separate callback function.
Now, if we run this... still nothing. We don't have any files to process. We can make an index.txt file in the src directory, and run it again:
echo "Hello world" > src/index.txtnpm run build
./src/index.txt1:1 error TypeError: Cannot `parse` without `Parser`at assertParser (file:///Users/breq/code/unified-example/node_modules/unified/lib/index.js:507:11)at Function.parse (file:///Users/breq/code/unified-example/node_modules/unified/lib/index.js:265:5)at parse (file:///Users/breq/code/unified-example/node_modules/unified-engine/lib/file-pipeline/parse.js:50:36)at wrapped (file:///Users/breq/code/unified-example/node_modules/trough/index.js:111:16)at next (file:///Users/breq/code/unified-example/node_modules/trough/index.js:62:23)at done (file:///Users/breq/code/unified-example/node_modules/trough/index.js:145:7)at file:///Users/breq/code/unified-example/node_modules/unified-engine/lib/file-pipeline/configure.js:76:5at file:///Users/breq/code/unified-example/node_modules/unified-engine/lib/configuration.js:138:11✖ 1 error
The pipeline is trying to process our input file, but it doesn't have any parser configured.
Link to this section Parsers
Parsers are what Unified uses to convert an input file into a syntax tree. They exist for plaintext (.txt files), Markdown, and HTML.
In general, packages to work with Unified are split into three groups: remark for handling markdown, rehype for handling HTML, and retext for handling plain text.
For our example, we're reading in a .txt file. We can use a retext plugin to convert it to a syntax tree. Currently, retext plugins are available for English and Dutch, plus a catchall retext-latin plugin for languages that use Latin-based scripts.
Let's assume we're going to work exclusively with English.
npm install retext-english
And now, we can add our parser to our pipeline.
import { unified } from "unified";import { engine } from "unified-engine";import retextEnglish from "retext-english";const processor = unified().use(retextEnglish);await new Promise((resolve, reject) => {// ...});
Give it another npm run build and...
./src/index.txt1:1 error TypeError: Cannot `stringify` without `Compiler`at assertCompiler (file:///Users/breq/code/unified-example/node_modules/unified/lib/index.js:520:11)at Function.stringify (file:///Users/breq/code/unified-example/node_modules/unified/lib/index.js:281:5)at stringify (file:///Users/breq/code/unified-example/node_modules/unified-engine/lib/file-pipeline/stringify.js:59:31)at wrapped (file:///Users/breq/code/unified-example/node_modules/trough/index.js:111:16)at next (file:///Users/breq/code/unified-example/node_modules/trough/index.js:62:23)at Object.run (file:///Users/breq/code/unified-example/node_modules/trough/index.js:33:5)at run (file:///Users/breq/code/unified-example/node_modules/unified-engine/lib/file-pipeline/index.js:57:10)at wrapped (file:///Users/breq/code/unified-example/node_modules/trough/index.js:111:16)at next (file:///Users/breq/code/unified-example/node_modules/trough/index.js:62:23)at done (file:///Users/breq/code/unified-example/node_modules/trough/index.js:145:7)✖ 1 error
Our pipeline is processing our file, but it can't stringify and save the result. This is where we need a compiler.
Link to this section Compilers
Compilers are what Unified uses to convert a syntax tree back into a file. Just like with parsers, they exist for all sorts of markup languages. For now, let's keep things simple and output the result as a .txt file.
Again, the retext ecosystem will help us. We can use retext-stringify as our compiler to output another .txt file.
npm install retext-stringify
import { unified } from "unified";import { engine } from "unified-engine";import retextEnglish from "retext-english";import retextStringify from "retext-stringify";const processor = unified().use(retextEnglish).use(retextStringify);await new Promise((resolve, reject) => {...});
Finally, our pipeline runs! We now have a dist/index.txt file containing our "Hello world" text.
...so what was the point of this? Right now, it seems like all we have is a complicated way to copy files between directories. But the intermediate syntax tree is where the magic happens—we can perform all sorts of processing steps on our text.
Link to this section Syntax Trees
Before diving into what syntax trees let us do, let's take a look at what one looks like.
Syntax trees in Unified follow the unist specification. This spec defines nodes, which can be either parent nodes (which contain other nodes) or literal nodes (which contain some specific value).
The unist-util-inspect package is a useful tool for inspecting unist syntax trees. Let's add it to our pipeline.
npm install unist-util-inspect
Using this library is a bit tricky right now. unist-util-inspect isn't aware of any of the Unified tooling we have—it's just a function that takes in a syntax tree. We need to hook into the pipeline somehow.
To do this, we need to write our own plugin.
Link to this section Making a Plugin
In the Unified ecosystem, a plugin is a function that takes in some options and returns another function. The returned function is then called on the syntax tree.
Let's write a plugin called inspectPlugin that logs the syntax tree to the console.
// ...import { inspect } from "unist-util-inspect";function inspectPlugin(options = {}) {return (tree, file) => {console.log(inspect(tree));};}const processor = unified().use(retextEnglish).use(retextStringify).use(inspectPlugin);await new Promise((resolve, reject) => {// ...});
Not too bad, right? Writing our own plugin only took 5 lines of code. Now, if we run our pipeline again, we should see:
RootNode[2] (1:1-2:1, 0-12)├─0 ParagraphNode[1] (1:1-1:12, 0-11)│ └─0 SentenceNode[3] (1:1-1:12, 0-11)│ ├─0 WordNode[1] (1:1-1:6, 0-5)│ │ └─0 TextNode "Hello" (1:1-1:6, 0-5)│ ├─1 WhiteSpaceNode " " (1:6-1:7, 5-6)│ └─2 WordNode[1] (1:7-1:12, 6-11)│ └─0 TextNode "world" (1:7-1:12, 6-11)└─1 WhiteSpaceNode "\n" (1:12-2:1, 11-12)
This is the syntax tree that our pipeline built. Specifically, this is the tree that retext-english created, and it's what retext-stringify used to compile our output file.
Link to this section Text Processing
Link to this section Spell Checking
There are plenty of retext plugins that can work with text. Let's start by adding spell checking to our pipeline using retext-spell. We also need to install a dictionary package: let's use dictionary-en.
npm install retext-spell dictionary-en
Now add
import retextSpell from "retext-spell";import dictionary from "dictionary-en";
to the imports, and add
const processor = unified()// ....use(retextSpell, { dictionary });
to the processor. You might notice that we're passing in an object to .use. These are the configuration options for the plugin. Most plugins take in optional options of some sort, but in this case, retext-spell requires the dictionary option.
Run our pipeline again, and nothing extra should happen. Let's misspell some words and run it again!
echo "Ehllo world" > src/index.txtnpm run build
1:1-1:6 warning `Ehllo` is misspelt; did you mean `Hello`? ehllo retext-spell⚠ 1 warning
And there you have it: spell checking!
Link to this section Other ReText Plugins
We can pull in more plugins, too. But first, let's get a bit more source text. I'm going to use a snippet of one of my project writeups:
The STM32 microcontroller this project used doesn't have any purpose-builthardware for generating sounds (that I'm aware of). So, the solution Isettled on was to manually generate a square wave by setting a GPIO pinhigh, waiting for half the length of the waveform, setting it low, andwaiting for the rest of the waveform.The biggest hurdle with this approach was accurate timing. The STM32 canuse interrupts to delay for a precise number of milliseconds, butgenerating square waves at specific frequencies requires sub-millisecondprecision. The solution I came up with was to calibrate a busy-wait loopwhen the code begins using the millisecond timer, then use that busy-waitloop for sub-millisecond-precision delays. This yielded a decent-soundingsquare wave, but the game audio still felt incomplete.
We should also probably stop logging the entire syntax tree to the console. Comment out the console.log for now in our custom plugin.
Let's install some more prose plugins. I'm going to throw pretty much the entire suite of plugins into our pipeline.
npm install retext-contractions retext-diacritics retext-equality retext-indefinite-article retext-profanities retext-repeated-words retext-smartypants retext-quotes
Our full code should now look like:
import { unified } from "unified";import { engine } from "unified-engine";import retextEnglish from "retext-english";import retextStringify from "retext-stringify";import { inspect } from "unist-util-inspect";import retextSpell from "retext-spell";import dictionary from "dictionary-en";import retextContractions from "retext-contractions";import retextDiacritics from "retext-diacritics";import retextEquality from "retext-equality";import retextIndefiniteArticle from "retext-indefinite-article";import retextProfanities from "retext-profanities";import retextRepeatedWords from "retext-repeated-words";import retextSmartypants from "retext-smartypants";import retextQuotes from "retext-quotes";function inspectPlugin(options = {}) {return (tree, file) => {// console.log(inspect(tree));};}const processor = unified().use(retextEnglish).use(retextStringify).use(inspectPlugin).use(retextSpell, { dictionary }).use(retextContractions).use(retextDiacritics).use(retextEquality).use(retextIndefiniteArticle).use(retextProfanities).use(retextRepeatedWords).use(retextSmartypants).use(retextQuotes);await new Promise((resolve, reject) => {try {engine({processor,files: ["./src/**/*.txt"],output: "./dist",},resolve);} catch (error) {reject(error);}});
And run! The file was written to ./dist/index.txt successfully, but there were a few warnings:
./src/index.txt > dist/index.txt1:5-1:10 warning `STM32` is misspelt; did you mean `STM32nd`? stm32 retext-spell1:11-1:26 warning `microcontroller` is misspelt microcontroller retext-spell1:45-1:52 warning Expected the apostrophe in `doesn't` to be like this: `doesn’t` smart-apostrophe retext-contractions1:113-1:116 warning Expected the apostrophe in `I'm` to be like this: `I’m` smart-apostrophe retext-contractions1:210-1:214 warning `GPIO` is misspelt; did you mean `GPO`? gpio retext-spell3:64-3:69 warning `STM32` is misspelt; did you mean `STM32nd`? stm32 retext-spell⚠ 6 warnings
A few technical words ("STM32", "microcontroller", "GPIO") are incorrectly detected as misspelled. We can add a personal dictionary to resolve this.
echo "STM32\nmicrocontroller\nGPIO" > dictionary.txt
Now, we can configure retext-spell to use our personal dictionary.
import fs from "fs/promises";const personal = await fs.readFile("./dictionary.txt", "utf8");// ...const processor = unified()// ....use(retextSpell, {dictionary,personal,});
Now, we only have quote errors remaining. retext-contractions expects us to use smart apostrophes. retext-smartypants adds those automatically. If you look at dist/index.txt, you'll see that doesn't is now doesn’t. So why is retext-contractions complaining?
Link to this section Plugin Types and Plugin Order
The issue is the order that our plugins are being used. Since retext-contractions comes before retext-smartypants, the smart quote insertion happens after the smart quotes are checked.
However, you might notice that retext-stringify is the second plugin we use, yet the other plugins modify the tree before it is stringified and written to disk. Why?
The answer is that retext-stringify works a bit differently than you'd expect. Instead of performing some operation on the tree directly, it configures the processor object, setting itself as the compiler. This means that even though the plugin is one of the first in the pipeline, nothing is executed until the pipeline reaches the compile step.
Let's reorder our plugins. I'm going to list the parser first, then the plugins that modify the tree (retext-smartypants), then those that check the tree (including retext-contractions), and finally the compiler (retext-stringify). Again, the parser and compiler can go anywhere in the order, but placing them at the beginning and end reduces confusion.
Our pipeline should run without warnings!
Now's a good time to stop and test out some of the plugins we're using:
- Spell something wrong for
retext-spellto catch - Put an apostrophe in the wrong place (e.g.
do'nt) - Miss some diacritics (e.g.
a la carte) - Use
a exampleinstead ofan example - Repeat a word,
The bird in the the bush - Use gendered language (e.g.
postman) - Use profane language (e.g.
stupid)
Unfortunately, with any large amount of text, a lot of false positives can occur. In most cases, you'll only want to use a few of these plugins to lint your text. I'm going to remove retext-contractions and retext-diacritics at this step.
Link to this section Markdown
You'll probably want to use Markdown for any serious work. Markdown allows you to embed links, images, code blocks, and other content into your text.
This is where the remark family of plugins can help. We'll use remark-parse to parse our Markdown files, and remark-stringify to convert the tree back to Markdown.
npm install remark-parse remark-stringify
Link to this section Splitting the pipeline
Right now, our plugins are designed to work with and modify a text syntax tree. If we want to process Markdown, we'll need some way to convert the Markdown syntax tree into a text syntax tree.
This is more complicated than it sounds. We can't use a plugin to replace the Markdown syntax tree with a text one, since we still need to output the Markdown.
What we can do is create a separate pipeline that only deals with prose. Let's move our existing pipeline to a new file, prose.js.
import { unified } from "unified";import retextEnglish from "retext-english";import retextStringify from "retext-stringify";import retextSpell from "retext-spell";import dictionary from "dictionary-en";import retextEquality from "retext-equality";import retextIndefiniteArticle from "retext-indefinite-article";import retextProfanities from "retext-profanities";import retextRepeatedWords from "retext-repeated-words";import retextSmartypants from "retext-smartypants";import retextQuotes from "retext-quotes";import fs from "fs/promises";const personal = await fs.readFile("./dictionary.txt", "utf8");const processor = unified()// Parser.use(retextEnglish)// Transform prose.use(retextSmartypants)// Check prose.use(retextSpell, {dictionary,personal,}).use(retextEquality).use(retextIndefiniteArticle).use(retextProfanities).use(retextRepeatedWords).use(retextQuotes)// Compiler.use(retextStringify);export default processor;
Now, we can import this in our index.js.
import { unified } from "unified";import { engine } from "unified-engine";import processor from "./prose.js";await new Promise((resolve, reject) => {try {engine({processor,files: ["./src/**/*.txt"],output: "./dist",},resolve);} catch (error) {reject(error);}});
Link to this section Parsing Markdown
We need some Markdown to parse. I'm using this as my source. Save it as src/index.md.
Next, we'll make a new pipeline that can parse Markdown, using remark-parse and remark-stringify. We'll also configure our engine to look for .md files instead of .txt files.
import { unified } from "unified";import { engine } from "unified-engine";import remarkParse from "remark-parse";import remarkStringify from "remark-stringify";const processor = unified().use(remarkParse).use(remarkStringify);await new Promise((resolve, reject) => {try {engine({processor,files: ["./src/**/*.md"],output: "./dist",},resolve);} catch (error) {reject(error);}});
Next, we need to actually do the split. If we want to bridge from Markdown to text, from remark to retext, we can use remark-retext!
npm install remark-retext
// ...import remarkRetext from "remark-retext";const processor = unified().use(remarkParse).use(remarkRetext).use(remarkStringify);// ...
You'll notice that this gives an error, though. The remark-retext plugin is looking for some retext parser to use. This is where our original prose pipeline comes in.
// ...import prosePipeline from "./prose.js";const processor = unified().use(remarkParse).use(remarkRetext, prosePipeline).use(remarkStringify);// ...
And now, the pipeline should run! You'll probably see some warnings about spelling, showing that the markdown content is getting fed through the spell checker. You might want to update the dictionary before moving on.
Link to this section Mutating Markdown
Look at dist/index.md. What happened to the smart quotes? In the prose pipeline, we feed our text through retext-smartypants to convert straight quotes and apostrophes to curly/smart quotes. But that isn't being reflected in the Markdown output.
Once we split the pipeline, any changes we make to the text syntax tree won't propagate back to the Markdown tree. Splitting is a one-way process.
Thankfully, we can use remark-smartypants instead of retext-smartypants to mutate the Markdown tree.
npm install remark-smartypants
Add it to the Markdown pipeline:
// ...import remarkSmartypants from "remark-smartypants";const processor = unified().use(remarkParse).use(remarkSmartypants).use(remarkRetext, prosePipeline).use(remarkStringify);// ...
Finally, remove retext-smartypants from the prose pipeline. Run the pipeline again, and you should see smart quotes in the Markdown output. You should also see that retext-quotes doesn't complain about quote usage. Since we apply retext-smartypants before splitting the pipeline, the changes are also reflected in the prose syntax tree.
Link to this section More Markdown Plugins
Let's add a few more plugins to our pipeline.
remark-slug: Generate a slug for each heading, letting people link directly to it.remark-gfm: Parse GitHub-style tables.remark-frontmatter: Parse YAML frontmatter.
npm install remark-slug remark-gfm remark-frontmatter
// ...import remarkSmartypants from "remark-smartypants";import remarkSlug from "remark-slug";import remarkGfm from "remark-gfm";import remarkFrontmatter from "remark-frontmatter";const processor = unified().use(remarkParse).use(remarkFrontmatter).use(remarkGfm).use(remarkSlug).use(remarkSmartypants).use(remarkRetext, prosePipeline).use(remarkStringify);// ...
Try adding some frontmatter, tables, etc. to the Markdown file.
---title: "Hello World"---| this | is || ---- | ----- || a | table |
Right now, we're just taking in Markdown and spitting it out. Let's try actually rendering it to HTML.
Link to this section HTML
Just as remark is used for Markdown, rehype is used for HTML. Instead of writing our Markdown pipeline back to Markdown, let's transform it to HTML and write that out.
We'll need remark-rehype to transform Markdown to HTML, and rehype-stringify to write the HTML back to a file. We'll also use vfile-rename to rename the .md files to .html files.
npm install remark-rehype rehype-stringify vfile-rename
Now, we can add these to our pipeline. vfile-rename isn't a proper plugin, but it only takes a bit of code to make it work.
// ...import remarkRehype from "remark-rehype";import rehypeStringify from "rehype-stringify";import { rename } from "vfile-rename";const processor = unified().use(remarkParse).use(remarkFrontmatter).use(remarkGfm).use(remarkSlug).use(remarkSmartypants).use(remarkRetext, prosePipeline).use(remarkRehype).use(() => (tree, file) => {rename(file, { extname: ".html" });}).use(rehypeStringify);// ...
Run the pipeline again, and you should see index.html with the output.
Link to this section Document Structure
You might notice that the index.html doesn't include <head> and <body>. In order to actually create a complete HTML document, we need to add those. rehype-document can turn an HTML fragment into a full document.
npm install rehype-document
Add it to the pipeline, and you should see a complete HTML document.
Link to this section Title
Our index.html has a <title> tag, but it's just set to index. Ideally, we'd want to be able to set the title from the frontmatter.
There's no existing plugin to take care of this, but we can write one ourselves. We can extract the title from the frontmatter using remark-extract-frontmatter, and then use hast-util-select and hast-util-from-string to modify the <title> tag.
npm install hast-util-select hast-util-from-string remark-extract-frontmatter yaml
Adding these, our pipeline looks like this:
// ...import { select } from "hast-util-select";import { fromString } from "hast-util-from-string";import YAML from "yaml";import remarkFrontmatter from "remark-frontmatter";const processor = unified().use(remarkParse).use(remarkFrontmatter).use(remarkExtractFrontmatter, { yaml: YAML.parse }).use(remarkGfm).use(remarkSlug).use(remarkSmartypants).use(remarkRetext, prosePipeline).use(remarkRehype).use(rehypeDocument, {title: "Untitled",}).use(() => (tree, file) => {const title = file.data.title || "Untitled";const tag = select("title", tree);if (tag) {fromString(tag, title);}}).use(() => (tree, file) => {rename(file, { extname: ".html" });}).use(rehypeStringify);
Set the title property in the frontmatter of the markdown, and check that it is updated in the .html output.
Link to this section Formatting
Right now, the HTML output isn't particularly readable. We can add rehype-format to clean things up. Alternatively, you might want to rehype-minify to reduce the file size.
npm install rehype-format
Add this to the pipeline right before the call to .use(rehypeStringify).
Link to this section Code
Add some code to the index.md.
```js() => (tree, file) => {const title = file.data.title || "Untitled";const tag = select("title", tree);if (tag) {fromString(tag, title);}};```
The HTML output is fine. The code is printed in a monospace font. However, in most cases, you'll want to display code with syntax highlighting. The Prism library is a popular choice, and it's supported in Unified through rehype-prism.
npm install @mapbox/rehype-prism
.use(rehypePrism)
This won't work on its own, however. We need to add the Prism theme to actually apply the highlighting. Thankfully, all we need to do is add the URL to the css option of rehype-document.
.use(rehypeDocument, {title: "Untitled",css: ["https://cdnjs.cloudflare.com/ajax/libs/prism/1.25.0/themes/prism.min.css",],})
There it is! Language-specific code highlighting has been added to the pipeline.
Link to this section Math
There are a lot of cases where you might want to include math in your Markdown. To accomplish this, math is typically written using LaTeX inside of $ blocks. Here's what it looks like:
$$ x = \frac{-b \pm \sqrt{b^2 - 4ac}}{2a} $$
Getting math to display in our pipeline takes two steps. First, when parsing Markdown, we need to add a new plugin to extract the math blocks into syntax tree nodes. Then, we need a plugin to render the LaTeX to HTML once we have our HTML syntax tree.
There are two major math libraries for the web: MathJAX and KaTeX. We'll proceed using KaTeX, since it is more lightweight.
npm install remark-math rehype-katex
Next, add these to the pipeline, and add the KaTeX CSS similarly to how we added the Prism theme. The pipeline looks like this:
const processor = unified().use(remarkParse).use(remarkFrontmatter).use(remarkExtractFrontmatter, { yaml: YAML.parse }).use(remarkGfm).use(remarkMath).use(remarkSlug).use(remarkSmartypants).use(remarkRetext, prosePipeline).use(remarkRehype).use(rehypePrism).use(rehypeKatex).use(rehypeDocument, {title: "Untitled",}).use(rehypeDocument, {title: "Untitled",css: ["https://cdnjs.cloudflare.com/ajax/libs/prism/1.25.0/themes/prism.min.css","https://cdnjs.cloudflare.com/ajax/libs/KaTeX/0.15.1/katex.min.css",],}).use(() => (tree, file) => {const title = file.data.title || "Untitled";const tag = select("title", tree);if (tag) {fromString(tag, title);}}).use(() => (tree, file) => {rename(file, { extname: ".html" });}).use(rehypeFormat).use(rehypeStringify);
Both remark-math and rehype-katex support both inline and block mode math. Inline mode can be written using a single $ as a delimiter, and block mode uses two $$.
Link to this section Music
You also might want to include sheet music notation in your Markdown. The most popular notation for embedding music notation in websites is ABC. There aren't any working remark libraries for this, but we can write our own.
For syntax, let's use three backticks like a code block, and set the language to abc.
```abcX: 1T: Nokia TuneM: 3/4L: 1/8K: Amaj| e'd' f2 g2 | c'b d2 e2 | ba c2 e2 | a6 |```
Now, we can start writing our plugin. Create a new file, music.js:
const remarkMusic = () => {return (tree, file) => {};};export default remarkMusic;
Import the plugin and add it to the pipeline in main.js.
The next step is to select the music nodes in the syntax tree. Let's start by just inspecting the whole tree, to get a sense of what we're looking for.
import { inspect } from "unist-util-inspect";const remarkMusic = () => {return (tree, file) => {console.log(inspect(tree));};};export default remarkMusic;
...└─10 code "X: 1\nT: Nokia Tune\nM: 3/4\nL: 1/8\nK: Amaj\n| e'd' f2 g2 | c'b d2 e2 | ba c2 e2 | a6 |" (42:1-49:4, 1623-1717)lang: "abc"meta: null
All right, our music is in the syntax tree, in a node with type="code" and lang="abc". Let's start by mapping the code nodes to abc nodes.
To perform this mapping, we can use unist-util-map.
npm install unist-util-map
// ...import { map } from "unist-util-map";const remarkMusic = () => {return (tree, file) => {return map(tree, (node) => {if (node.type === "code" && node.lang === "abc") {return {type: "abc",value: node.value,};} else {return node;}});};};// ...
If you run the pipeline now, you'll see that the ABC source is now just kind of dropped into the HTML. Unsurprisingly, remark-rehype has no idea what to do with it.
If, however, we add a data field to the abc nodes we create, we will be able to pass an HTML syntax tree node to remark-rehype.
const remarkMusic = () => {return (tree, file) => {return map(tree, (node) => {if (node.type === "code" && node.lang === "abc") {return {type: "abc",value: node.value,data: {hName: "div",hProperties: {className: ["abc"],style: "color: red",},hChildren: [{type: "text",value: node.value,},],},};} else {return node;}});};};
In this example, we just create a div for the ABC source, and show it in red.
However, if we want to actually render ABC to HTML, we'll need to use a library that works with the DOM. Let's get things set up beforehand by creating a DOM element and converting it to an AST node.
Since we're working with Node, we don't have access to a global document object from which to call createElement. Instead, we can use JSDOM. We'll also need hast-util-from-dom to convert the DOM node to an AST node.
npm install jsdom hast-util-from-dom
import { JSDOM } from "jsdom";import { fromDom } from "hast-util-from-dom";// ...const remarkMusic = () => {return (tree, file) => {return map(tree, (node) => {if (node.type === "code" && node.lang === "abc") {const {window: { document },} = new JSDOM();const renderInto = document.createElement("div");renderInto.innerHTML = node.value;renderInto.style.color = "red";const data = fromDom(renderInto);return {type: "abc",value: node.value,data: {hName: data.tagName,hProperties: data.properties,hChildren: data.children,},};} else {return node;}});};};// ...
All right! We've done almost everything we need, all that's left is to map some ABC source to an HTML DOM node. Thankfully, considering the popularity of ABC notation, there's a library for that: abcjs.
npm install abcjs
Now, we just tell abcjs to render into our JSDOM node.
const remarkMusic = () => {return (tree, file) => {return map(tree, (node) => {if (node.type === "code" && node.lang === "abc") {const {window: { document },} = new JSDOM();const renderInto = document.createElement("div");ABCJS.renderAbc(renderInto, node.value);const data = fromDom(renderInto);return {type: "abc",value: node.value,data: {hName: data.tagName,hProperties: data.properties,hChildren: data.children,},};} else {return node;}});};};
If you're following along, you might get an error after this step. ABCJS relied in the global window object, which doesn't exist in Node, up until this commit. At time of writing, it hasn't made it into a proper release yet. As a workaround, you can install the 6.0.0 beta:
npm install abcjs@^6.0.0-beta
And... still doesn't work. When rendering to a DOM node, ABCJS tries to call document.createElement, which (obviously) fails. We will need to patch the package manually.
npm install patch-package
I added the following patch:
diff --git a/node_modules/abcjs/src/write/svg.js b/node_modules/abcjs/src/write/svg.jsindex 174602b..fae9221 100644--- a/node_modules/abcjs/src/write/svg.js+++ b/node_modules/abcjs/src/write/svg.js@@ -2,6 +2,9 @@/*global module */+const JSDOM = require("jsdom").JSDOM;+const document = (new JSDOM()).window.document;+var svgNS = "http://www.w3.org/2000/svg";function Svg(wrapper) {
And... there we go! Runs without issue, and transforms our ABC source into beautiful sheet music.
Link to this section Pulling it all together
Let's throw a few more styles in, just to make things look a bit nicer.
.use(rehypeDocument, {title: "Untitled",css: ["https://cdnjs.cloudflare.com/ajax/libs/prism/1.25.0/themes/prism.min.css","https://cdnjs.cloudflare.com/ajax/libs/KaTeX/0.15.1/katex.min.css","https://cdnjs.cloudflare.com/ajax/libs/bootstrap/4.6.1/css/bootstrap.min.css",],style: "body { margin: 0 auto !important; max-width: 800px; }",})
And finally, let's throw some markdown at this! Here's a snippet that includes basically everything we're doing:
---title: My Awesome Markdown---# Hello, World!This is a Markdown document. It's a good test for our pipeline. I hope I ~~spellled~~ everything right. If someone finds a spelling **error**, she should let me [know](mailto:breq@breq.dev).- This is a list item- This is another list item1. This is a numbered list item1. This is another numbered list item## Tables| $x$ | $x^2$ || --- | ----- || 1 | 1 || 2 | 4 || 3 | 9 |## Formulas$$x! = \begin{cases}x = 0: & 1 \\x > 0: & x (x - 1)! \\\end{cases}$$$$x = \frac{-b \pm \sqrt{b^2 - 4ac}}{2a}$$## Code```pythondef bisect(f, a, b):c = (a + b) / 2if f(c) == 0:return celif f(a) * f(c) < 0:return bisect(f, a, c)else:return bisect(f, c, b)``````jsxexport default function Home() {return <span>Hello, world!</span>;}```## Music```abcX: 1T: Nokia TuneM: 3/4L: 1/8K: Amaj| e'd' f2 g2 | c'b d2 e2 | ba c2 e2 | a6 |```
And, let's render it one last time.
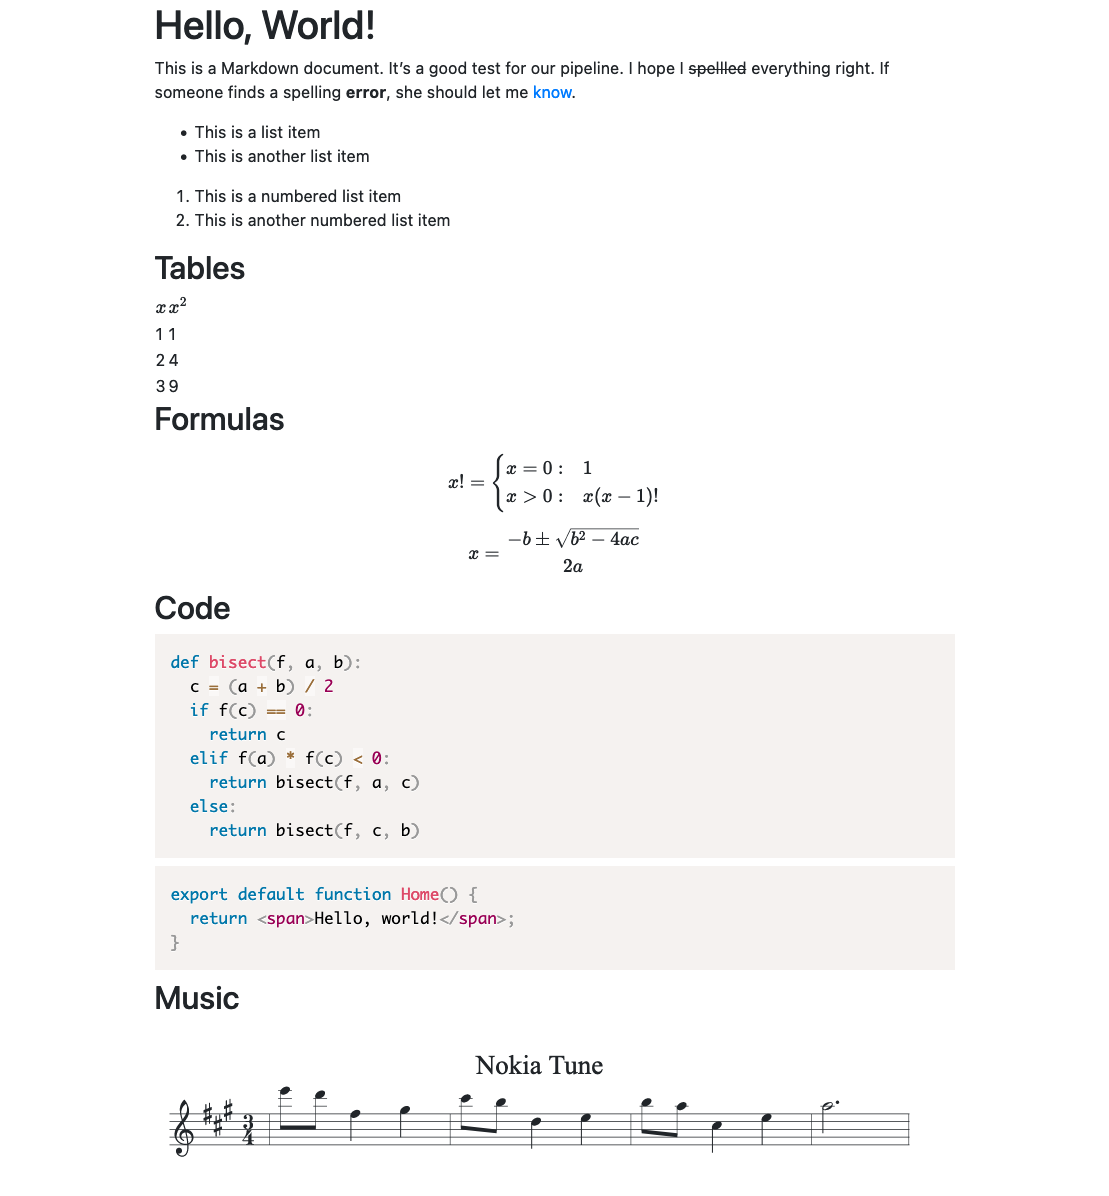
Looks nice! And we'll check the warnings:
./src/index.md > dist/index.html8:3-8:11 warning `spellled` is misspelt; did you mean `spelled`? spellled retext-spell8:71-8:74 warning `she` may be insensitive, use `they`, `it` instead he-she retext-equality⚠ 2 warnings
The pipeline is warning us about both the spelling error and the unnecessary use of gendered language.
Link to this section Summary
We've built a pipeline that, ultimately, turns Markdown into HTML. But we've used the Unified ecosystem to add plenty of other features:
- Use YAML frontmatter to set the page title
- Use Github-Flavored Markdown to render tables, strikethroughs, and other features absent from CommonMark (the commonly used Markdown spec).
- Parse ABC notation and render sheet music
- Add syntax highlighting to code blocks
- Render LaTeX math formulas
- Add slugs to headings to support direct linking
- Convert simple/straight quotes into smart quotes
- Pretty-print the output HTML
As well as our prose pipeline, which checks the source text for:
- Spelling mistakes, including use of a personal dictionary to ignore certain words
- Potentially insensitive or inconsiderate language (such as gendered pronouns)
- Improper use of "a" versus "an"
- Potentially profane language
- Words that are are improperly repeated
- Mistakes with quote usage
This is quite the feature set! And it goes to show just how broad the Unified ecosystem is. Most of these plugins could be added to the pipeline with just one line of code.
You can see the final result in this repo.
Link to this section Epilogue
One final note: over the course of writing this, I actually decided to publish the music plugin to NPM. It's available as remark-abcjs, and it bundles a patched version of abcjs to avoid having to patch it yourself. Give it a try!
npm install remark-abcjs